Defining Fields
The Add/Edit Field page is used to define your database fields. It is displayed when you choose to add a new field or modify a field in the Information Field Query page. Every field definition includes the data type, the access level required to interact with the field, and, if the data type is one that displays options for the user to select, a list of options. Optional settings allow you to select another field that controls the availability of the field, set minimum and maximum lengths for text fields, and select a field that will supply the option list if options are allowed.
When you add fields to Form Entries, you can add text that helps the user understand exactly what information is being requested and set style attributes that can adjust the size of your fields according to the amount of information expected or increase the height of a list to make more options visible.
Base Definition
A field's Name must be unique within your database. It is displayed in field lists and should describe the information stored in the field or the field's purpose. Because of other programming needs, names cannot begin with a hash tag #.
Data Type
Select an appropriate data type for the information you will store in a field with the Type setting. In addition to types that encompass different data types, you can choose from specialized fields that have been customized for certain types of information or that cause actions to be performed.
DATA TYPES:
Characters - stores text up to phrase or sentence length
Integer - Integer fields only accept whole numbers
Decimal - Decimal fields accept values with or without a decimal point.
Selection - the options are presented in a drop-down list, one value may be selected
|
|
If a field will store information that you will want to use to filter documents, use a field with selectable values. Users can misspell, abbreviate, or use variations of names or terms that would cause filters to fail even though a document actually contains the information that meets a condition. |
Date and Date/Time - date format is MM/DD/YYYY and the time format is HH:MM:SS with a 24-hour clock (3:00 PM is 15:00:00)
Check Box - when clicked, the box is either checked or cleared, either a Yes or No value is saved
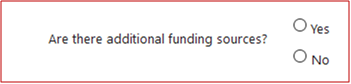
Radio - the options are presented as a number of labeled buttons, one button may be selected
![]() Phone Number - only the digits are entered by the user for a 999-999-9999 format
Phone Number - only the digits are entered by the user for a 999-999-9999 format
![]() Email Address - ensures that the format is __________@__________.xx
Email Address - ensures that the format is __________@__________.xx
![]() Check Box - when clicked, the box is either checked or cleared, either a Yes or No value is saved
Check Box - when clicked, the box is either checked or cleared, either a Yes or No value is saved
![]() Radio - the options are presented as a number of labeled buttons, one button may be selected
Radio - the options are presented as a number of labeled buttons, one button may be selected
![]() Attachment - allow your users to upload files to augment their documents. When the field is empty, "No attachment" is displayed in red (required) or blue (optional). When an attachment has been uploaded a "View Attachment" link is provided, along with a "Delete Attachment" check box. When you click on the View Attachment link the browser will attempt to display the contents of the attachment using the default application for the file's extension - Excel for a file that ends in .xls, for example. You can also right-click on the link and choose "Save link as..." to download the attached file.
Attachment - allow your users to upload files to augment their documents. When the field is empty, "No attachment" is displayed in red (required) or blue (optional). When an attachment has been uploaded a "View Attachment" link is provided, along with a "Delete Attachment" check box. When you click on the View Attachment link the browser will attempt to display the contents of the attachment using the default application for the file's extension - Excel for a file that ends in .xls, for example. You can also right-click on the link and choose "Save link as..." to download the attached file.
![]() Contributor Fields -
Contributor Fields -  A contributor is a person that an applicant names or selects as someone who must "contribute" information to the document in order for it to be complete. That person may be a reference, an authorizing supervisor, or anyone else whose input is required. Contributors are notified that they have been asked to provide information with an email that contains a link to the form that they must complete. See Built-in User Types and Using Email for more information about contributors.
Contributor fields have a unique setting that is not used for any other field type: Target Form. The Target Form is the form that the contributor is to complete, and is the form that they will first see when they log in using the link in their notification email. The Target Form setting also appears in the email definition and it serves to link the contributor field, notification email, and contributor form together for access control, status, and tracking purposes. If the Target Form is not set the contributor cannot log in. By clearing the Target Form setting in the field definition, you can effectively disable one type of contributor without changing the Login permission for the contributor user type.
|
|
Due to the link between the Contributor field and the notification email, a particular Contributor field can only be used within one document - they cannot be shared between different documents. You may, for example, have three different types of grant applications that all require a principal approval. A separate Contributor field must be used in each of the documents even though all three fields are collecting the same type of information. |
A Contributor field collects the name and email address the contributor - either through direct entry by the applicant or by the selection made from a Contributor Selection field that displays a list of contributors that you define. When a Contributor field is displayed in a form, it includes status information regarding the contributor's form and either the status of the email notification or a link to the email that was sent as shown to the right.
|
|
Use a Contributor Selection field when possible. It will take more time to set up but can save you the time you would otherwise spend dealing with mis-addressed emails that bounce back to you. You can configure your list in a spreadsheet and import the options as you can with other selection fields. |
Alpha Characters Only - similar to Characters but will only allow alphabetic characters to be entered
Other - Characters - a Characters field that is tied to a Selection field and only becomes available when "Other" is the value selected in the list. You must set the Selection field as the Parent. You can use this type of field to augment the options in a Selection field, and use the occurrences of like values in that field as an indicator of values that should be added to your list.
Information Control
Specify which users can view and edit a field's value with its Access Class. Some information should be kept private to protect the applicant and you may want to conceal information that would identify an applicant for a blind review process. User Type permissions include settings for the field Access Levels that users are permitted to view (query) and edit (modify), allowing you to configure fields whose values some users will be able to edit, some will only be able to view, and some users won't be able to see at all.
![]() A user with Query and Modify permissions can see and edit the value
A user with Query and Modify permissions can see and edit the value
![]() A user with only Query permission can only see the value
A user with only Query permission can only see the value
![]() A user with neither permission can see the field in the form but the value is masked with asterisks (there is no correlation between the number of characters or digits in the value and the number of asterisks)
A user with neither permission can see the field in the form but the value is masked with asterisks (there is no correlation between the number of characters or digits in the value and the number of asterisks)
|
|
Other conditions and other permissions also affect whether a user can edit a field's value. The user may only have permission to modify a document when it is in a different state. The document's Closing Time may have passed, in which case applicant's are prohibited from making changes. |
Field Relationships
You can associate groups of fields with the Parent Field setting. When the selected Parent Field's value is set (check boxes are often used as Parent Fields), the "child" fields become available. In this way you can easily configure fields that collect additional information based on the options a user chooses. When you add a child field to a Form Entry as a , the conditions are automatically set based on the parent/child relationship.
|
|
The Parent Field selection, once saved, cannot be changed. If you think a relationship may not be permanent, use the conditional field definition in form entries or a conditional form to control field availability instead. |
 When you arrange fields in a table format, parent/child relationships must be defined in order to properly group the field values in rows. The field that appears in the first column is usually designated to be the Parent Field.
Using Common Field Options
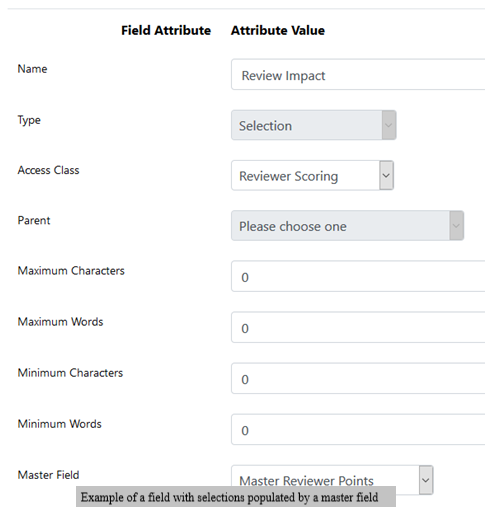
Any field Type that supports an options list can populate that list from a Master Field. When the field is displayed, it uses a copy of the options defined in its Master Field. When you make changes in the Master Field's options, those changes will ripple through the values saved in all related fields and the new options are shown the next time a related field is displayed.
There are many ways that you can use Master Fields:
![]() When a list of schools is used more than once in a document
When a list of schools is used more than once in a document
![]() To standardize scoring selections, whether numeric or text options are used
To standardize scoring selections, whether numeric or text options are used
![]() When the same choices are often used in Radio fields - Yes/No or Yes/No/Don't Know
When the same choices are often used in Radio fields - Yes/No or Yes/No/Don't Know
User list fields
There is now a new field type called Users of Type This option allows you to display all users of a specified user type, dynamically updated when users are added/removed/disabled. Also, we specified which field (from a user account) to use as a displayed value and which to use as a stored value. "Full Name" and "Last Name" options are sorted in ascending order. This type of list would allow you to select a counselor, principal, district authority, etc. This field will not be shown in the field "type" but will show up in the Master Field when you are using a Selection field type. When on the Master Field, the user list should appear with the names of user types.
Length Requirements for Text Field Values
Use Maximum Characters, Maximum Words, Minimum Characters, and Minimum Words to set the minimum and maximum words required for values entered in Long Text fields or the minimum and maximum characters required for values entered in one of the other types of text fields. When the user saves a form, they will be notified of all of their entries that do not conform to the defined requirements and the form will not be complete until all entries pass the validation tests.
![]() Minimums are set to 0 by default
Minimums are set to 0 by default
![]() Maximum Characters defaults to 250
Maximum Characters defaults to 250
![]() Maximum Words defaults to 65,535
Maximum Words defaults to 65,535
 The Selection, Multi-Selection, Radio, and Contributor Selection fields all display options that a user can choose from. After you have created and saved one of those fields, you can modify the field definition and define the options displayed. The control icons on the Edit Field page allow you to add, modify, and delete the options in the list.
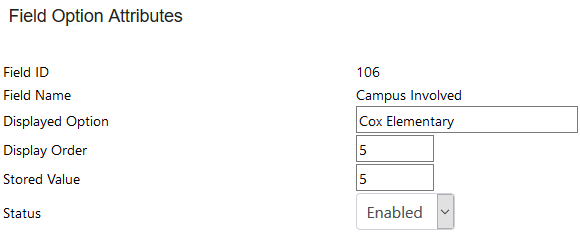
An option is defined by the following attributes:
![]() Displayed Option - the text that is displayed to the user
Displayed Option - the text that is displayed to the user
![]() Display Order - sets the position of the option; options are shown in Display Order on the Edit Field page
Display Order - sets the position of the option; options are shown in Display Order on the Edit Field page
![]() Stored Value - sets the integer value that is saved in the database
Stored Value - sets the integer value that is saved in the database
![]() Status - enables or disables the option; new options are enabled by default
Status - enables or disables the option; new options are enabled by default
|
|
If you are defining the options for a Contributor Selection field, the Displayed Option must contain the contributor's name and email address in the following format: name<email address> (e.g., My Principal<myprincipal@myschool.com>). Only the name is displayed when the list is used in a form. |
Modifying Existing Option Values
Since the Display Order and the Stored Value of an option are stored separately, you can easily insert a new option in a list or change the order of the options. When adding entries for a selection field, the "Display Order" and "Stored Value" is automatically set to the next available number (Max+1). With this feature, it makes it a lot easier so you do not have to keep going back and forth to see what order you need your entries in. Also, if you need to modify your display order, it will auto shift everything else for you.
Changing an Option's Status
You can effectively remove an option from a field without deleting it by changing its Status to Disabled. A Disabled option only appears in documents that have previously saved the option's value, allowing documents from previous years to be properly displayed. When editing a new document the disabled option is not displayed, making it impossible for it to be chosen. Using this method, rather than deleting the option, preserves the integrity of documents that contain the option's value while still making the option unavailable for current documents. If, for example, you include a list of counselors in a scholarship application or a list of principals in a grant application, you can adjust your lists as necessary to accommodate turnover by disabling the options for persons no longer in the position and adding new options for their replacements.
Importing and Exporting Field Options
![]() You may find that it's easier to work with lists in a spreadsheet, where you can use the Fill option to sequentially number the Display Order values or form an option list from a list that you already keep in a spreadsheet.
You may find that it's easier to work with lists in a spreadsheet, where you can use the Fill option to sequentially number the Display Order values or form an option list from a list that you already keep in a spreadsheet.
The Export current options link converts the current definitions to a comma-separated value (CSV) file that can is displayed in a new browser window or tab. Save the file with a .csv file extension so that your spreadsheet program will recognize it as a file it can work with.
After you have modified the list, make sure that you save it in the CSV format and then use the Browse... button to select your file. The file will be imported and the options changed when you save the field definition.
Also see: