Using Document States
When you process applications using paper forms, the documents move through the different stages of your process. Those stages may not have formal names - you may keep track of the stage an application is in by placing in a pile, bin, or file - but the process starts with an applicant filling out an application. At some point, hopefully before your submittal deadline, the applicant delivers their application to your office along with any supplemental materials that you require. Your office staff may check each application for completeness and make sure that all requirements have been met. Applications that do not meet the informational requirements are set aside and those that do meet the requirements advance to the next stage. At this point, you may have to pass the applications through an approval authority who ensures that an application meets a different set of requirements, and again some applications can advance to the next stage and some will not. Finally, some type of review is performed, perhaps a blind review that conceals the applicant identities, that ultimately determines which applicants will receive the object of the application.
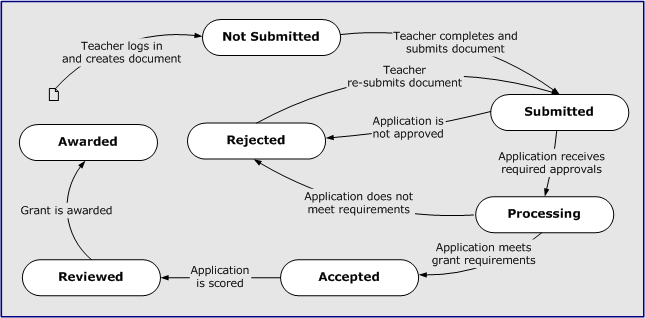 One of the most powerful tools in your web site is the ability to define a "state machine" - think of it as defining the stages of your process - and the ability to tie actions and user permissions to particular states. The diagram to the right shows a state machine for a generic teacher grant process. The states are shown in bold, and the arrowed lines between the states describe the action or condition required to move from one state to another. In this example the teacher's grant application transitions through the following states:
 The default state, achieved by simply creating a document, is Not Submitted.
When the teacher has completed all of the required information in the application he chooses the Submit button, performing the action that changes the application's state to Submitted.
In this case, the teacher's principal must approve the application before it will be considered by the foundation. The principal can choose to either Approve the application, moving it to the Processing state, or Disapprove the application, moving it to the Rejected state.
If the document moves to the Rejected state the teacher can re-submit the application, assuming that the deadline has not passed and the principal is willing to approve a revised application. Even if it has been in that state before, the same Approve/Disapprove action is needed to move the document on to the next state. This time the principal approves the application and the document moves on to the Processing state.
Up to this point, the document states have been tracking the submittal and external approval portions of the process. Going forward the state is used to track your foundation's handling of the application.
You or your staff check the application against the requirements set forth for the grant. If you find that those requirements were not met you could Reject the application, sending it back to the Rejected state where it would remain (assuming that the submittal deadline has passed). In this case, however, the application is acceptable and the Accept action is taken, advancing the document to the Accepted state.
After your reviewers score the application, completing the actions performed in the Accepted state, you can move the application to the Reviewed state.
When it is determined which applicants will be awarded grants you can change the state of their applications to Awarded, allowing you to easily retrieve the winning applications from the current or previous years. In this case only the Awarded applications are retained. The rest of the applications are left in the Reviewed state and would eventually be deleted. You could add a Declined or Archived state as the final state for those applications if you found it useful to retain those documents.
State Machine Benefits
Now that you know the basics of a state machine, how can it help you? Using a state machine is not mandatory - although you will need to configure some user permissions to prevent applicants from modifying their applications after the documents are submitted - and you may not want an all-encompassing state machine like the one used in the example, but a state machine can automate some parts of your process and relieve you of the need to re-configure user permissions during your application cycle. Since every foundation's state machine can be different, the diagrammed example is used as a reference in the rest of this topic.
Control Access to Information
One aspect of information control has already been mentioned: preventing applicants from modifying applications after they have been submitted. This is accomplished through user permissions. Every User Type has two permissions, modify document and delete document, that are related to a document's state. You can configure the applicant type permissions such that an applicant can modify or delete documents that are in the Not Submitted or Rejected states, or only the Not Submitted state if you intend to make Rejected a final state and not allow applications to be re-submitted. By setting these constraints, you can allow the applicants to continue to log in and to monitor their applications as they advance through your process rather than locking them out after the submittal deadline. Likewise, you can configure the principal type to only have modify permissions in the Submitted state, the reviewer type to only have modify permissions in the Accepted state, and prohibit everyone from deleting a document in any state after Not Submitted.
When you're viewing a list, you can easily screen the list to only display documents that are in the state you select. By using Document State in a filter criteria, you can configure filters for the different user types that can be applied to a list so as to only display documents that they can modify or that they need to see for a particular task - an Applications to be Checked filter that displays the applications in the Processing state for your staff, or a Reviewer's Document List filter that only displays applications in the Accepted state, for example. You can also set a Default Filter in the preferences for a user type and guarantee that users of that type can only see documents that are in the appropriate state.
As with any other field, you can use Document State in the test for a conditional form or a conditional field. When you use the field itself in the test, you can test for one state; when you use a filter in the test, you can display a form when a document has progressed to one state or any of the subsequent states.
Trigger Email Notifications
Email notifications allow you to take advantage of even more automation. You can keep concerned parties informed throughout the process by configuring a few notification emails.
Reassure applicants that their documents were successfully submitted with a confirmation email that is sent whenever a document enters the Submitted state.
At the same time you notify the applicant that a document was submitted, notify the principal that an application is awaiting approval.
Notify an applicant that the application has been Rejected and include instructions on how they may remedy the situation.
Control State Changes
As you define your state machine, you can set explicit permissions that govern the actions a user type can invoke while a document is in a particular state. In our example, the applicant can invoke the Submit action when their document is in the Not Submitted or Rejected state, the principal can invoke an Approve or Disapprove action when a document is in the Submitted state, and staff can invoke an Accept or Reject action when a document is in the Processing state. Typically the superuser type has permission to invoke any action that is allowed for a document's current state so that corrections can be made.
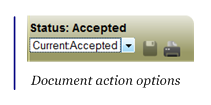 When a user has permission to invoke an action and the document's status and state are such that an action is possible, a field widget is displayed in the navigation bar under the current state. If the user can only invoke one action a button is displayed; if more than one action is available a drop-down list is displayed. There are occasions when some instructional text would be helpful to the user - in the case of the principal's approval form in our example, for instance, we want to make sure that the principal understands that he must select the action and then save the form. In that case, you can place a Document Action field in a Form Entry and include header and assistance text.
|

|
Contributors will only be able to view the document state status only if they have permission to change states. If they do not have permission to change document states, the status will be concealed.
|
Track State Changes
One of the built-in fields, State History, tracks every state change applied to a document. When you add it to a Form Entry and select Display Field Info, you can see who invoked the action that resulted in the current state and when that action was invoked. Add repeat start and repeat end entries before and after State History, and you can see all of the document's state changes starting with Submitted (add a Document Created Time field above repeat start if you need to know when the document was created).
Managing States
The Document States page displays a list of all of the states currently defined. From this page you can use the control icons to create new state definitions, modify your state machine, modify User Type permissions, and delete states.
Adding a State
Click on the  icon above the state list and you are prompted to enter the new state's name. Save the state and then edit the state to define the new state's position in your state machine.
Modifying a State's Definition
Click on the  icon in the state's Control column and you are directed to the Edit State page where you can configure the actions that cause a document to enter or exit the state.
Modifying Action Permissions
Click on the  icon in the state's Control column and you are directed to the Document State Permissions page where you can set permissions for the User Types that can invoke document actions.
Deleting States
Click on the  icon in the form's Control column to delete a state and confirm the action. Built-in states cannot be deleted.
|

|
If you had defined links between this state and other states, revisit the definitions of the other states to repair the gap in your state machine. Likewise, if you had used the deleted state in any conditional tests, filters, or email notifications you may need to modify the form and filter definitions.
|
Next Steps:
Configuring Your State Machine
Setting State Change Permissions
Also see:
Setting User Permissions
Setting User Preferences
Defining Forms