Defining Forms
The Edit Form page is used to configure the data structure, layout, and behavior of your forms. It is displayed when you choose to modify a form in the Forms Page. There are two parts to a form's definition:
![]() The form's Settings, that identify the form type and format, control who can view the form or modify its definition, and when and how the form is displayed
The form's Settings, that identify the form type and format, control who can view the form or modify its definition, and when and how the form is displayed
![]() The form entry definitions are set in the Form Builder, that define what information is displayed on the form, how that information is displayed, and whether your users can interact with the fields in the form
The form entry definitions are set in the Form Builder, that define what information is displayed on the form, how that information is displayed, and whether your users can interact with the fields in the form
This topic explains the form Settings - Adding Information to Forms explains the Form Builder.
When you first go to add or edit a form, you will be defaulted to the Form Builder tab. You will need to click on the form settings tab  in order to create or change the settings. When creating a new form, this is the first step. You will primarily make changes to the form builder and will not change settings frequently after the form is created.
Saving the Attributes
If you have changed any of the Attributes, the ![]() icon at the top of the page becomes enabled and you can click on it to save your changes. When you create a new form, you must save its attributes and then return to define the form builder.
icon at the top of the page becomes enabled and you can click on it to save your changes. When you create a new form, you must save its attributes and then return to define the form builder.
Form Format and Type
These settings can be found at the bottom of the Attributes section of the page and control the way a form can be used and how the appearance of the form is defined. Once the Format settings have been saved, it cannot be modified.
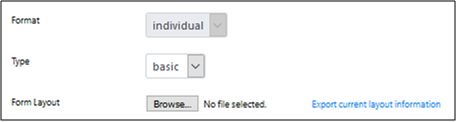 Choose whether the form will display the information from one document or multiple documents with the Format setting.
![]() Individual forms can be used as part of a document form set or as standalone forms.
Individual forms can be used as part of a document form set or as standalone forms.
![]() List forms display information from multiple documents.
List forms display information from multiple documents.
The form Type determines the layout of the form.
![]() A basic form displays its information according to the order and format you define in the Table Row entries.
A basic form displays its information according to the order and format you define in the Table Row entries.
![]() An visual form uses a drag and drop “what you see is what you get” (WYSYWYG – pronounced wizywig) system to build the form.
An visual form uses a drag and drop “what you see is what you get” (WYSYWYG – pronounced wizywig) system to build the form.
Form Name
 Your form must have a Name that is unique within your database and the name should describe the form's purpose.
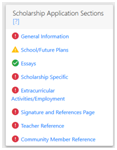
![]() The name of an individual form is displayed in the navigation box, as shown in the example to the right. The name of the parent form is always displayed first with "Sections" appended to the name and the names of the rest of the forms in the set are displayed in the order defined by Position (more on Position below).
The name of an individual form is displayed in the navigation box, as shown in the example to the right. The name of the parent form is always displayed first with "Sections" appended to the name and the names of the rest of the forms in the set are displayed in the order defined by Position (more on Position below).
![]() The name of a list form is displayed in the list selection field on the Documents Page.
The name of a list form is displayed in the list selection field on the Documents Page.
The form's Description is also used differently depending on the form's type:
![]() If the form is part of a document, the description is displayed when the user's mouse hovers over the link to the form in the Document Navigation Bar. In this case the description should provide additional information to the user as to the information contained in the form.
If the form is part of a document, the description is displayed when the user's mouse hovers over the link to the form in the Document Navigation Bar. In this case the description should provide additional information to the user as to the information contained in the form.
![]() The description for a a list form is only displayed on the Forms Page and it can be use to provide you and your staff with additional information about the list contents.
The description for a a list form is only displayed on the Forms Page and it can be use to provide you and your staff with additional information about the list contents.
![]() The notes section can be used by administrators to track thoughts, changes and other notes that would benefit you. This information only displays on the form settings.
The notes section can be used by administrators to track thoughts, changes and other notes that would benefit you. This information only displays on the form settings.
User Permissions
In the View Permission list, select all of the User Types that will have permission to view this form. This setting does not control who can view the information contained in any of the fields used in your form - that is controlled by the Access Levels of the fields and the user's Query Info permission. The Modify Permission attribute defines the types of users that can change the set up of this form. This setting is typically restricted to the superuser and staff User Types.
Document Form Settings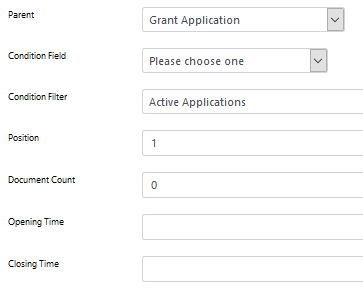
Parent Form
Every document has one, and only one, parent form. The parent form is the first form in the set and it typically has no content (think of it as a cover sheet). In order for a user to be able to view any of the forms in a document they must have permission to view the parent form, which is why it usually holds no content. The parent form itself cannot have a Parent setting but all of the forms that are part of a set must have the same parent form. This is how the system determines which forms belong to a particular document.
Conditionally Displaying Forms
You can configure forms to only be displayed when a condition is met anywhere in the document - when the user sets a value in a field or when the current information in the document allows the document to pass through a filter. Use the Condition Field and Condition Filter lists to set the conditions under which a form is displayed. As with any conditional setting, if you don't set any conditions, the form is always displayed. Any value entered in the selected Condition Field, including checking a check box, causes the form to be displayed. A filter can be used to test for a specific value in one field, a group of values in a multi-selection list, or values from a combination of fields.
Setting the Order of Forms
Position determines the order of forms within a document. The position of the parent form should be 0 if it has no content; otherwise it should be 1. Subsequent forms should be ordered as you would number the pages in a paper document.
Document Count
You can control how many documents an applicant can create with Document Count. The page that an applicant is shown after logging in depends on whether they can create more than one document.
![]() If an applicant can only create one document and only has access to one type of document, a document of that type is created the first time the applicant logs in. On subsequent logins the applicant can only access that document.
If an applicant can only create one document and only has access to one type of document, a document of that type is created the first time the applicant logs in. On subsequent logins the applicant can only access that document.
![]() If an applicant can create more than one type of document but can only create one of each, a link to each document type is displayed after logging in.
If an applicant can create more than one type of document but can only create one of each, a link to each document type is displayed after logging in.
![]() If an applicant can create multiple documents and has already created one document, a list form with add and control icons is displayed after logging in. Upon clicking the add icon, the applicant can choose which type of document to create if more than one document is accessible.
If an applicant can create multiple documents and has already created one document, a list form with add and control icons is displayed after logging in. Upon clicking the add icon, the applicant can choose which type of document to create if more than one document is accessible.
Cycle Definition
Control when documents can be created, edited, and submitted with the Opening Time and Closing Time settings. When the current date and time is between the opening and closing times, applicants can create new documents and modify or submit their documents. When the closing time has passed, applicants can view their documents but cannot edit the documents or submit documents.
List Form Settings
You can assign a filter to a list form with the Forced Filter setting. By doing so, you can ensure that the form always displays information that has been properly filtered regardless of who is accessing the list since a filter applied in this manner cannot be cleared. The information displayed in the list can be further screened by applying saved or ad hoc filters, whether the filter is applied by the user or assigned as the user's default filter. Using this feature you can present groups of documents to reviewers, for example, rather than only allowing them to access one list that contains all of the documents they must address. The default filter assigned to reviewers could simply screen documents based on document state, restricting them from seeing any document that is not eligible for review, while each list that they use could further screen documents based on the criteria for a specific scholarship or grant.
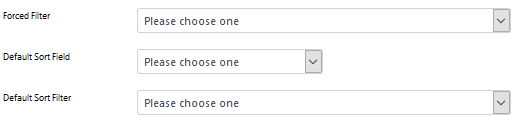 The Default Sort options for the list form allows you to add a Default Sort Field and a Default Sort Filter. Before, the list would normally sort what was on the first column. Now, you may apply which Field or Filter you want to be sorted as default. This restricts reviewers from only seeing the documents that are eligible for that default field or filter.
|
|
If you switch from one list to another and both lists have the Forced Filter setting, the filter associated with the first list is cleared and the filter associated with the second list is applied. If you switch from a filtered list to a list without a Forced Filter, the filter associated with the first list will remain in place until you either clear or un-apply it. The same thing applies to the Default Sort Field and the Default Sort Filter. |
Next step:
Also see: