Using Filters
Filters are the most powerful tools at your disposal. Fields store information, forms collect and display information, document states define the steps in your process, and permissions control a user's access to information as well as their access to actions. Filters have a role in all of these areas and as you learn how filters work and the many ways in which they can be used, you will find more and more uses for them. Filters can perform two basic functions: screening and calculating.
Using Filters to Screen Lists
When you were working with paper documents you probably sorted them into stacks when it came time to group them by campus, grant, subject matter, scholarship, or reviewers. It would be extremely difficult to find people willing to participate in your process if they all had to look though hundreds of applications to find the dozens that required their input. Screening filters can do that sorting for you as long as you can describe the factors that would cause you to place a document in one stack versus another. When you define a filter those factors become the filter's criteria.
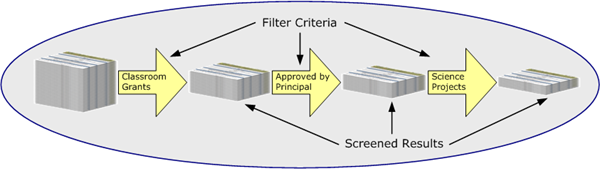 Assume that you need to build a stack of Classroom Grant applications that must be approved by the school district's science curriculum specialist prior to entering your review cycle, and that your starting point is a stack of Classroom Grant and Professional Development Grant applications submitted by applicants. Your first step is to extract the Classroom Grant applications from your pile. The curriculum experts aren't interested in seeing any applications that haven't first been approved by the applicants' principals, therefore your next step is to extract only the approved applications from your Classroom Grant application stack. Finally, you need to find only the approved Classroom Grant applications that are proposing projects with science as the subject matter.
Each time you extracted a set of applications from a stack you were applying a criterion to every application in that stack, and you ultimately ended up with a new, smaller stack. That is exactly how screening filters work - they contain a set of criteria that, when applied to each of the applications in your database, results in a subset of applications that meet all of the criteria. The previous paragraph can be condensed into three criteria that an application must satisfy according to the values stored in database fields:
 Document Form is equal to Classroom Grant (the name of the application's parent form)
Principal Approval is equal to Yes
Includes Science Component is equal to Yes
After you have defined a filter and an appropriate list form, you can configure the science curriculum reviewer's permissions and preferences such that the only documents they can access are those that meet the filter's criteria (see below for more on permissions and preferences). As an added bonus, you only have to define the filter once and can use the same filter year after year.
Using Filters to Calculate Values
A filter's criteria can do more than just form sets of documents - it can also perform calculations using the values within a document. You can display the results of those calculations within a document's forms or on a list form, or include the resulting value in another calculating filter. Calculated values are not saved in the document but are re-calculated when the filter results are displayed, and therefore always reflect the current values saved in the database. An important distinction between screening filters and calculating filters is that screening filters operate on a set of documents while calculating filters operate on the values within one document.
After you have become familiar with the mechanics of defining filters, refer to the "How To" section for more information on defining filter that can calculate:
Weighted scores
Sums
Averages
The minimum and maximum values entered in a field
The number of values entered in a field
Conditional values
Using Filters to Conditionally Display Forms
One of the settings in the definition of a form, Conditional Filter, enables you to configure forms that are only displayed when the criteria of the selected filter is met. The operation of a conditional form filter is similar to a calculating filter in that the criteria tests one or more values within one document. Conditional forms are not necessarily additional forms to be displayed - you can design several forms of a similar nature, one of which will always be displayed depending on selections made on other forms in the document. A References form may always be displayed in a scholarship, for example, but the specific reference form that is displayed may be determined by conditional filters that take into account scholarships in which the applicant indicated interest.
Filters, Folders, User Permissions, and User Preferences
The user's ability to add filters, modify filters, and query/apply saved filters is governed by their permissions, and a default filter can be set in the user's preferences. When you assign a default filter to a user who does not have permission to modify their preferences, you are effectively restricting their access to only the documents that meet the filter's criteria. Users who cannot modify their preferences cannot clear their default filter and that filter is applied to every list form that they can access. By using this method you can ensure that an approving authority (e.g., principal, counselor, district designee, etc.) can only access the documents over which they have authority, whether the determining factor is document state, a campus, or the subject matter of a project. You can also use this capability to assign or match reviewers with documents either by matching a value in the document with an attribute added to the user's account or by adding assignment fields to the document and then matching the account's user name with an assignment value in the document.
Filters may be stored in folders, and a folder is automatically created for every user who can add new filters. Within your user folder you can create sub-folders to organize your filters by purpose, by document, or by any other category that is useful to you. You can also make filters available to certain users by storing them in a top-level folder and then granting those users query permission for that folder. See Organizing Filters for more information regarding folders.
|

|
In order for any type of filter to be accurately applied, the user must at least have QueryInfo permission for all of the fields that are referenced in the filter criteria. If the user does not have permission to query one or more fields, an empty value is returned from the document and your filter will not function as designed.
|
Creating Low Maintenance Filters
A bit of planning can reduce or nearly eliminate the effort involved in updating your filters when your process or applications change from one cycle to the next. You will find, for example, that Document State is used as a criterion in most of your screening filters. Assume for the moment that your grant process utilizes the state progression Not Submitted > Submitted > Approved, that the approved state is reached through a principal's approval, and that you have defined all of the filters used for the review and award processes to include a "Document State equal to Approved" criterion. You are then informed that in your next cycle the applications will also have to be approved by a district curriculum designee and your grant applications will now need to progress to an Accepted state, indicating the designee's approval, before they are eligible for the review cycle. In addition to the other changes you will have to make, you will also have to modify all of the filters for the review and award process to point to the new Accepted state rather than the Approved state. Since a filter criterion can be the result of another filter, you could have used an "Eligible for review" filter that tested Document State in your review filters and an "Eligible for award" filter that also tested Document State along with, perhaps, a minimum score in your award filters. In that case, when your state machine changed you would only have to adjust those two filters and by doing so you would have effectively modified all of the review and award filters. In addition to saving time, you have also reduced the chance of introducing an error by reducing the number of changes made. As you are designing your filters, think about using logical descriptions of the criteria and then see how often you use a particular description. Descriptions that you use repeatedly would be good candidates for independent filters.
Saved Filters vs. Ad Hoc Filters
 So far this topic has focused on filters that you create and save and can use over and over again. All users, regardless of their filter permissions, have the ability to create ad hoc filters that are immediately applied to a list. Ad hoc filters can be as simple as the example shown - screening a list by the value of one field - or they can involve multiple criteria. If a user is assigned a fixed default filter, any ad hoc filters that they create can only operate on the results of the default filter. Ad hoc filters can be converted into saved filters if the user has permission to add filters. See Use Filters to Screen Lists for more information about working with ad hoc filters and applying filters to lists.
The Filters Page displays the folders and filters that a user can access. From this page you can use the control icons and menu options to create new filters, modify filter definitions, copy filter definitions, delete filters, and organize your filters into folders.
Viewing Filters
The Filters Page always displays your filter folder and its contents if you have defined any filters or sub-folders. Your folder will be expanded by default (the  icon is displayed) and you can expand sub-folders by clicking the associated
  icons. You will also see all of the folders for which you have query permission and can expand those folders and view their contents.
Screening a List
Any filter that you can view can be applied to a list of Documents, Records, or Users. You can also create ad hoc filters without leaving the list page. See Use Filters to Screen Lists for more information on working with list screens.
Using Folders
You can use the  icon to add a sub-folder to your user folder or to add a top-level folder. You can delete a folder by using its
  icon. Filters can be moved from one folder to another by modifying the filter's definition. Refer to Organizing Filters for a full discussion of folders and how they may be used.
|

|
Deleting a sub-folder also deletes any filters that it may contain. You should always inspect the contents of a sub-folder prior to deleting it (see Deleting Filters for more information).
|
Adding a Filter
There are two components to a filter definition: the filter's name and location, and the filter's criteria. Click on the  icon of the folder that will contain the filter and you are directed to the Add New Filter page where you will define the name and location. Enter the Filter Name, select the containing Folder if necessary (if you used your user folder icon to add the filter, you can still choose to store the filter in a sub-folder; if you used a sub-folder icon, the sub-folder is selected but you can select a different folder), and then click the Add this filter button. Next, you will define the filter's criteria. Refer to Defining Filter Criteria for more information.
Modifying a Filter Definition
To modify the filter's name or change its parent folder, click the  icon. You can modify the Filter Name or the filter's Folder as necessary and then click the Update this filter button to save your changes. If you wish to move a filter from a sub-folder to your user folder, set the Folder list to "Please choose one". When you update the filter you will be directed to the Criteria Query page.
To modify only the filter's criteria, click the  icon to access the Criteria Query page. Refer to Defining Filter Criteria for more information.
Copying a Filter Definition
When you have already defined a filter that is similar to a new filter that you want to create, it may be more efficient to copy and existing filter and modify the criteria. Click the  icon to copy the filter and you are directed to the Copy Filter page where you can modify the Filter Name and the filter's Folder and then click the Update this filter button to save your changes. If you choose not to modify the filter's name, the default name will be "Copy of" <existing filter name> (e.g., Copy of Accepted Applications). After the copy has been saved you can modify the filter's criteria as described in Defining Filter Criteria.
Deleting Filters
To delete a filter, click the filter's icon and confirm the deletion on the Filter Delete page. You can also delete a filter from the Criteria Query page with the Delete Filter menu option.
|
|
Deleting a filter that is used in another filter, used as a condition form filter, or assigned as a user's default filter can have undesirable effects such as invalidating scoring rubrics, restricting access to information that should be available, or granting access to information that a user should not see. If you are not sure where and how a filter is used you should at least make a copy of the filter before deleting it. If you find that you need to restore the filter, you can change the name of the copy to the original filter's name. You can always delete the copy after verifying that your documents are operating as expected.
|
Next steps:
Defining Filter Criteria
Also see:
Using Document States
Setting User Permissions
Setting User Type Preferences